I'm making this little tutorial for those of you, like myself, who follow pictures, particularly photographs better than words...
Please note: the numbers on the pattern instructions are slightly different from here, same order, different pace!
So here we go!
You'll need:
- the pattern: containing the pattern pieces
- tracing paper
- 2 different cotton fabrics for the body (half of a fat quarter for each is plenty)
- 16x9" of lightweight iron on interfacing
- small scraps of felt for skin, hair & antenna colours
- embroidery thread for facial features
- 16x9" plain fabric for back piece
- about 200g of poly-fil or other stuffing
Have handy:
- sewing machine
- scissors
- pins & needles
- iron
- stuffing stick (or pencil w. rubber on the end works just as well
- thread
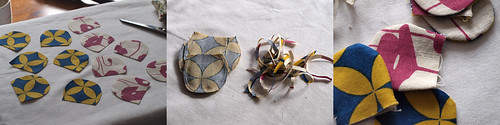
Cut out:
1 head piece
1 face piece
1 hair piece
2 of each antenna piece
12 hand pieces
All seam allowances are 10mm except for the felt pieces, which are about 3mm.
10mm= approx. 1/3rd of an inch
3mm= approx. 1/10th of an inch
-------------------------------------------------------------------------------------------------------------
Ready to begin?
1. Make up the body piece by taking your 2 cotton fabrics, and cutting some strips of varying heights, which are all the same width as the body piece. Sew them together in an alternating pattern until the new piece is as long as the pattern piece. Press the seams.

2. Now sew the head piece to the body piece, press seams and iron on the interfacing, trimming the excess interfacing off from around body piece.
3. Take the 12 hands pieces and pair them up. Stitch around the curved ends 2 times to make them extra strong. Trim down to reduce bulk before turning out, and press with a hot iron until they keep shape.
4. Time to make the face and cut your little bug a groovy hair-do! You can use the guides from the pattern to hand embroider your face, or you can design your own.
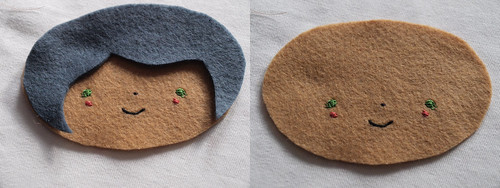
I like to get a little creative here and encourage you do the same. I cut the face, then the hair-do, and then I know how much space I have to play with in terms of the facial features.
Some simple rules are that the eyes should be about half way down the face, that the nose should be right in the middle the eyes, or a little further south, that the middle of the mouth should be in line with the nose, and that eyelashes make ordinary bugs pretty!
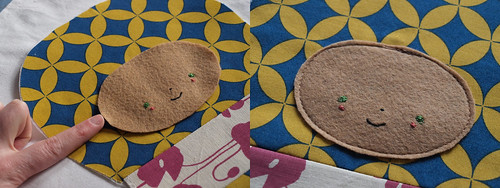
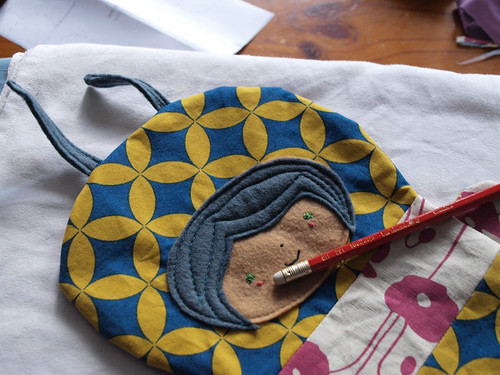
5. Back to the sewing machine, where you will be stitching the face to the head:
- use the pattern piece as a placement guide, double checking that the face has been placed in the horizontal centre of the head (that's what I'm doing with my finger in the photo)
- begin at the centre-top of the face and stitch around the perimetre slowly and carefully, and quite close to the edge, and do some back-stitching when you start
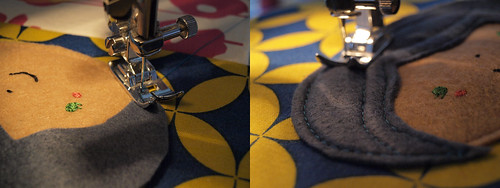
6. Time to stitch the hair to the face:
- change thread to match the hair colour
- place the hair in position on top of the face
- begin at the bottom-left-hand point of the hair, and stitch around the perimetre of the piece, slowly and carefully, and quite close to the edge
- if you're feeling confident, you can add some extra lines for hair detail as I have simply by sewing some curved lines in the middle of the piece, but remember to come back to your starting point, and make some small and neat back stitching to keep it in place

And ta-da! She's really looking bug-like by now isn't she??
7. Antenna time: pair up the 4 antennae pieces so that the same sized pieces are sitting on top of one another. Stitch the 2 pieces together in the same manner that you stitched the hair to the face. I do this 2 times for good measure, and I NEVER EVER worry about neatness here, I like the antennas to look a little rough and different from one another. Repeat with other pair!
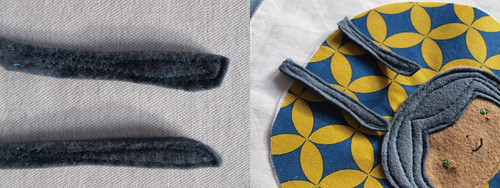
Position on the face, in line with each eye.
8. Hand Placement: Using the pattern piece as a guide, arrange the hands along the side of the body, ensuring that these pieces are butted up right against the edge of the body:

Now, move your body piece aside for a minute, and grab the backing piece-- smooth it down on your workspace and place the pinned body piece on top of it, but facing down. Re-pin the hands and antenna pieces through all layers of fabric and pin the rest of the pieces ready for sewing.
ALMOST THERE NOW!
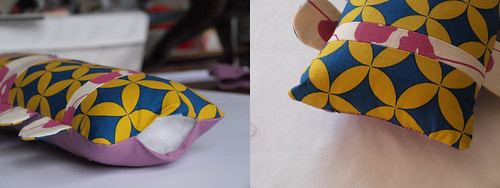
9. Starting at point marked 'a' on the pattern piece, begin stitching all the way around the perimetre of the bug piece until you reach the point marked 'b'. Trim the backing piece so that it is the same size as the front piece.
Now you need to turn your bug the right way out and check that everything is ok, such as that the hands and antennae have been stitched into the right place, and that everything generally looks good. Once you are happy, turn it inside out again, re-stitch over the same path as before, and make some little snips where the head meets the body (as shown).

10. Now you can turn your bug out for good! You might need to use the stuffing stick or pencil at this point to make sure all the edges of the bug are turned out properly. Iron your new little guy or girl from the back, and get ready to start stuffing...
Make sure that the bug is stuffed firmly before you use blind stitch to finish up!
And here we have little Beatrice Baily, who likes cherry blossom lip balm, apple strudel and the beach, and who doesn't like feisty dogs, loud music or naughty children.

I'll put that pattern up soon, I promise!
Tell me if you spot typos!
Tell me if you like it, and feel free to offer constructive criticism!
Now to email the bug swappers!
B.
P.S.
Fabric credit, because I know people will ask!
The blue and yellow is by Anna Maria Horner, I think it's called cathedral. Sydney siders can get it from The Remnant Warehouse (best fabric shop in Sydney!)
The floral is by Danielle Smeets at Of Paper and Thread, which is Australian... Yay!
9 comments:
What a cutie! Thanks for sharing.
Ooo, this tutorial is so exciting! I can't wait to see your .pdf and try making a bug myself. :)
very cute!
Oh so gorgeous! Wish I could sew!!
Hi Rebecca
I'm so excited to be a part of your swap :-)
Just a small correction
1 inch equales approx 25 mm and not 10 mm
Thanks Isa! It's fixed!
Hi Rebecca - just a little thing about sewing the bug together. You don't really explain about trimming the backing fabric after sewing it all together. With experience I just know that you would have to do this, but maybe a sentence in there spelling this out would be useful.
Everything else is easy to follow and I am well on the way to completing mine for the swap. I discovered I don't have any dark brown cotton, so an excuse to go to the material shop tomorrow!
She is an adorable little bug. Thank you for the tutorial and pattern I would like to make some for charity to put under the K Mart Christmas
Tree with a label that has your name and blog address if that is ok?
I've just finished mine today, & it has been sent! It was fun to make, so thanks Rebecca for a great project!
Post a Comment